Showing posts with label DIY. Show all posts

Sunday, 27 January 2013

d.i.y. Sunday : beanie


DIY SUNDAY : how to make a beanie out of an old jersey
all you'll need is a jersey, some sewing stuff and 15 minutes of your life
p.s. I'm not one to waste so I made a pair of socks too :)

Tuesday, 22 January 2013

treat yo'self !

treat yo'self to the best treat of all time : FRIDGECAKE.

every now and then our school tuckshop would have a batch on sale and kids would go nuts for the stuff; sell-your-scientific-calculator-for-a-square kinda nuts. It's really easy and quick to make, like, really easy. Here's how:

YOU WILL NEED:
200g biscuits (I like to use Marie biscuits)
150g milk chocolate
150g dark chocolate
100g butter
150g golden syrup

THAT'S ALL YOU NEED.

feel free to throw in some marshmallows/nuts/dried fruit (yuck)/anything else delicious

METHOD:
-melt everything except the biscuits in a bowl in the microwave
-pour this stuff into a greased container
-crush up your biscuits (i put them in a plastic bag and smash a wine bottle on them a couple of times)
-mix the biscuits in with the choccy-mix
-put in the fridge for 20 minutes or so
-cut into delicious squares
-have with a cup of tea

Sunday, 20 January 2013

d.i.y. Sunday : crown me

I've been slack with DIY-ing haven't I? Well, I've been working on a whole lot of craft-y posts for you and will be sharing them starting from next week! its a house have asked me to be their DIY guest blogger (YAY) so the posts will be going up on their website

today I made a double-sided fabric crown because wearing a crown is the best

Sunday, 16 December 2012

crafty sunday : gifting

I love this season 'cause ... PRESENTS. 

The gift of giving is a real thing - whatta feeling! I've started using fabric as wrapping paper 'cause a) it looks so pretty and b) spending money on wrapping paper seems gross; fabric is reusable! Buy yourself some pinking shears (aka zig-zag-y scissors) for general fabric craftiness. The zig zag edges prevent fraying so you don't have to do any bo-ring hemming, yay.
I made my friend a little bag for a ring and fabric cards for earrings, HOW NICE, RIGHT♥
P.S. HERE are some nice-y gift ideas

Sunday, 9 December 2012

d.i.y. Sunday : bag + chain

Clutch bags, hey. They look cute but are super impractical and a mugger's dream. I turned this one I got at a market into a usable bag with a bit of ribbon and some gold chain from the haberdashery.

Sunday, 11 November 2012

d.i.y. Sunday : satin pillow cases

I found some cream-coloured satin while clearing out my fabric cupboard and it gave me an idea for a quick DIY project. My cotton pillowcases are quite old and sad looking so I made some smooth and sleek replacements out of the satin! Not only does it feel like you're sleeping on an angel's wig, but satin pillow cases are good for your hair, skin, and your allergies (I know it's true 'cause I read it in a Yahoo! article).

Pillow cases are really easy to make so I won't bore/insult you with a step-by-step. Just remember that when sewing something simple the best thing to do is to copy what you already have, not forgetting to add 1cm around the edges for seam allowance :)

Have a lovely Sunday! I'm just going to lie in bed & listen to The Drums (next week!)

Monday, 5 November 2012

ice cream sandwiches!

This weather has had me hankering after my favourite kinda ice cream: chocolate ice cream sandwiches. They don't make them anymore (or at least I can't find them anywhere) so I made some myself. All it took was some of my homemade ice cream  (I used Milo instead of peanut butter this time) and a packet of Tennis biscuits.
Just sandwich (ha) some ice cream between 2 biscuits and put them back in the freezer for a while before enjoying the hell of out them. 

These are SO GOOD, GUYS!

(ice cream sandwich print from HERE)

Sunday, 4 November 2012

d.i.y. Sunday : zines!


on Friday I went to a zine market and left with both a sweet zine and an urge to go out and MAKE ZINES.


zines are basically self-published books/comics/mini-magazines on WHATEVER topic you want: drawings of items you'd find in a kitchen, an illustration of a dream you once had, radical collages… Anything! I got this one by 'Jenna' which is full of poems using Google's search recommendations 


I love it.


The zine market is open to anyone's creations. Keep in touch/in the loop through the facebook group make zines at night

HERE is a nice aticle from Rookie, which shows you how to get started and has some links to explain the concept of zines to you a little better and to get you inspired.

Sunday, 28 October 2012

d.i.y. Sunday : stamps


I've been experimenting with fabric paint and stamps lately. I made a whole set of my own stamps and now just want to stamp everything with crowns/hearts/diamonds! They're real easy to make, let me show you:


STEP 1 : cut your shape out of the foam (available by the sheet at art shops)
STEP 2 : glue the shape to the cork (also available from art shops. I bought a whole bag.)
STEP 3 : get stamping! Painting fabric paint onto the stamp with a brush between each stamp gives you the neatest finish


Yeah, stamps!

I used my crown-y one and some lilac paint to decorate a head-scarf

Sunday, 14 October 2012

d.i.y. Sunday : Dino Collar


I finally got around to making these collar tips I dreamed up a while ago and OH BOY I love them!

Go on and make some for yourself, it's quick and easy

YOU WILL NEED:
-clip-on earring bases (from the bead shop)
-plastic toys
-gold paint + brush
-super glue
-gold cardboard
-craft-knife


STEP 1
decapitate your toys (carefully) with your craft knife. 

STEP 2
paint their little heads gold

STEP 3
cut 2 triangles out of your cardboard and stick the dino heads on them

STEP 4
glue the triangles onto your clip-on earrings


yay!

I'll be making more of these and selling them with blouses/shirts soon, so if you're lazy you can still get your hands on some :)


facebooktwitter

Sunday, 30 September 2012

d.i.y. sunday : shortening pants

Today was more of a crafty day than a DIY. I bought some dungarees from Vintage Lover this weekend with only one flaw; their super awkward length (since when is mid-knee an acceptable for denim?). So I altered them quickly. So many people ask me to shorten things for them which is firstly SO BORING so please don't ask, and secondly SO EASY so do it yourself, my friend!

The two mistakes most people make when shortening pants/skirts/dresses are not measuring properly, and cutting off too much fabric.

MEASURING: put on your item and put pins in the front and back where you'd like the new length to be. Take them off and measure how far up you pinned (if they're at different points find the mean number - this is where my A+ for Maths Literacy really comes in handy). Then place a few pins along your measurement.


CUTTING: Cut along your pin-line but don't be lazy and try cut through both layers or things could go all skwonky. Don't forget to add a centimetre or two at the bottom so you can hem nicely, unless you are a barbarian and don't hem things.


YAY dungarees!


P.S. how nice does the afternoon light look on my bed?


facebooktwitter

Sunday, 23 September 2012

d.i.y Sunday : cat alice-band

Gemma Correll
Today I felt like bringing some feline fun into my life/onto my head. Grab a black alice-band, some wire and some black fabric (I used velvet, for that Expensive Cat look)


1 : cut 4 house-shaped bits out of your fabric (triangles with a bit extra on the bottom)
2 : stitch them together, leaving the bottom open
3 : cut your wire to fit along the stitch line, turn the ears inside-out and pop the wire in
(cute cat polaroids by Sofie Fagerlund)
4 : stitch the bottom closed, trapping the wire inside (ignore the wire's screams of "'help! we're trapped!")
5 : bend the ears around your alice-band so just the triangle bit of your house-shape sticks up. position them as you please (closer together for a curious cat, further apart for lazy cat) and glue them in place if you want this alice-band forever (but the wire should stay in place quite well without glue)


i'm fighting the urge to end this off with a cat pun…

mee-wow!


facebooktwitter

Sunday, 2 September 2012

DIY Sunday ♡ : key makeover!


If you live in Observatory your house is gonna need a lot of locks. I get confused with all my keys so I made them pretty using my favourite art supply, nail polish


I think they look kind of super adorable.

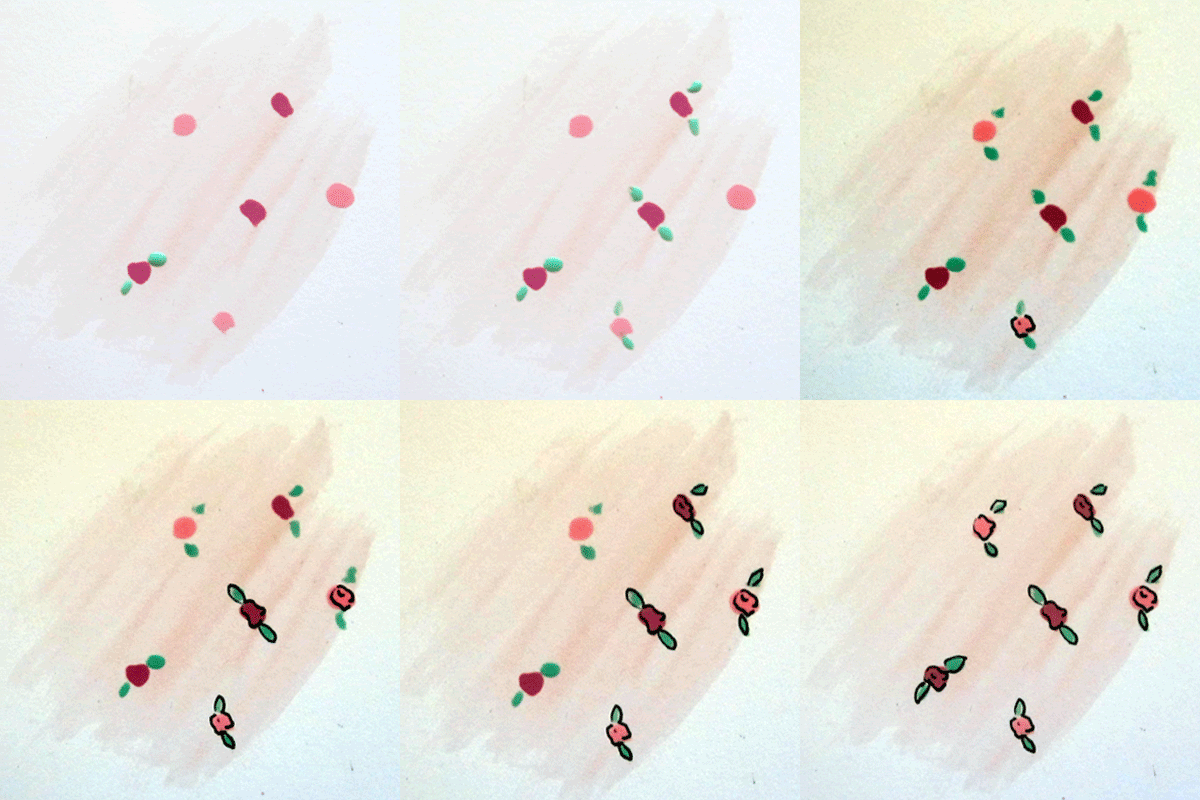
I enjoy painting stuff like this on my nails; even simple hearts make people gasp. I used to look at pretty nail-art on Pinterest and think only an artist could paint such lovely little flowers but it's actually quite easy if you have some time on your hands (I like to do it while watching Downton Abbey). 

I've made some educational GIFs for ya


You'll need:
nail polish + a fine permanent marker + a thin brush or stick (for little details)

LEOPARD PRINT


step one : round-y splodges
step two : 1 or 2 squiggly 'c' lines around the splodges

p.s. one time I did this on my eyes (insider tip: use eye-shadow and eye-liner instead of nail polish) and it looked amazing


HEARTS


instead of trying to draw hearts, which can get messy, just do little 'v's


FLOWERS


step one : round-y splodges
step two : 2 green lines around the circles
step three : 2 squiggly '3' shapes around the circles
step four : draw around the leaves

Sunday, 12 August 2012

D.I.Y. Sunday ♡ : Half-Moon Nails

NAIL ART! I know there are also a million tutorials for crazy-fun-coco-loco artwork for yo nails online, but I kept seeing pretty photos of two-tone half-moon nails and wanted to try it for myself. For some reason I couldn't even imagine how it could be done, but it's actually SO easy and looks really nice so...let's go!

Just noticed that at a glance it looks like my sleeves are my skin and I am wearing little white gloves. 
This is the life of a pale girl.

YOU WILL NEED:
-2 nail colours that you think will look nice together
-round stickers (I used some I had lying around but the most ideal kind are those 'reinforcement rings'. I looked all over for them but couldn't find any. Filing is declining!)


1. Paint your nails the colour your want the little arc at the base (the 'half moon') to be. Wait for them to be totally dry before the next step.


2. Stick your stickers so that the curve follows the curve of your half moon area. Press the stickers down real tight so that no polish can seep underneath.


3. Paint your nails the other colour. Paint over the stickers so you'll end up with a nice & crisp line when you peel them off.


4. Wait to dry completely before very slowly peeling off the stickers. Pop on a top coat and you're done!

Picture: WAH NAILS

P.S. how nice do these look?!

Sunday, 5 August 2012

DIY Sunday ♡ : Last Minute Gift Ideas

It's hard being poor-ish, isn't it? I truly love giving people gifts but it can get expensive and I've had to find creative ways of making people feel special. Here are some ideas for when you're feeling broke, when you're out of ideas, or when you've left it 'til last minute:


1. MONEY


Money is the easiest and most appreciated gift to give to young people but it can feel impersonal and as though you haven't put any thought into it. Rather than slipping a note or two into a card, make a song and dance about it! Use the ancient art of origami to turn that dollar bill/hundred rand note into a little piece of art. My personal favourites: A heart, a dollar sign and a 3D pyramid, ooh!


2. TREATS


Everyone has popcorn kernels lying around somewhere in their house, and everyone loves popcorn. To take your ordinary serving of Butter Lovers to Great Gift level, you've got to spruce it up a bit.


This Snickers popcorn recipe sounds incredible, coloured popcorn looks pretty, and for those with a savoury tooth throw some raisins and dried fruit in the mix.


Gift your treats in a simple brown bag, or a nice old tin (another thing everyone has lying around, right? I know I do.)


*giving old things to people is allowed these days. Call it vintage and you'll get away with being a cheap friend*


3. PAINT IT BLACK


Invest in some blackboard paint and you can turn almost anything into a chalkboard.


The next time you're feeling panicky about a friend's upcoming birthday just grab a tray, or a piece of wood, or a globe, or any other item that would be quite nice to draw on with chalk, paint it with a coat or two and you're good to go.


*save on the card and write your wishes on your blackboard-ed gift*


4. MORE TREATS


Cupcakes are quick & easy and there are a million ways to make them look exciting and aw-you-shouldn't-have-y.


Arrange your cakes into a bouquet you can eat, recreate these adoraworable cookie monsters, or if you're not feeling creative just throw on every semi-delicious thing you can find; 100s and 1000s, jelly tots, strawberries, Nutella, cut 'em open and stick them together with peanut butter, bananas...the possibilities are endless (actually the possibilities end at meat and tinned goods. Probably.)


5. FLOWERS


Flowers are another fail-safe present guaranteed to make your friend smile/blush/react allergically. To avoid it looking like you stopped at Woolies on the way over you're going to need to put in a bit of effort, but just a little! Click HERE to find out how to turn white flowers into RAINBOW FLOWERS.

Sunday, 1 July 2012

DIY Sunday ♡ : Vanilla Fudge


OK, maybe more of a recipe than a DIY but I felt like making fudge and I'm trying to be consistent with this whole DIY thang.
Fudge is one of my favourite sweet treats. It is INSANELY sweet (always a positive), really easy to make, and makes a great gift. People love fudge I'm telling you. You're welcome!
Me and my besties used to make tons of this stuff, dress up weird (pyjamas and lots of plaits!! we-ird!) and walk 'round her neighbourhood selling it to her poor neighbours. Ah, to be 16 again am I right? JOKES. We were younger. Probably. Hopefully.

I haven't made fudge in years but today I did and I'll share this super easy recipe with you. I have Google-d recipes before but it is near impossible to find anything without nuts or peanut butter or chocolate chips. NO. I want plain and simple vanilla fudge, and so do you, here we go!


YOU WILL NEED:
-125g butter
-500g castor sugar
-1 tin of condensed milk
-a little bit of vanilla essence

STEP 1: Chuck all ingredients except the vanilla essence in a microwaveable bowl

STEP 2: Pop bowl in the microwave and set microwave for about 12 minutes (cooking time ranges from 12 to 15 minutes)

STEP 3: You need to watch the bowl in the microwave for the whole 12 minutes. The minute you look away/blink it will begin to rise up and try to overflow and cover your microwave floor in a hot sticky mess, like this

naughty overflowing ingredients
When it does this take out the bowl (with a cloth, it's hot!) and give it a stir. The longer it cooks for the more often you have to do this, it gets tiring but stick it out, this fudge is worth it.

STEP 4: After about 12 minutes it should start thickening and browning. I did mine a bit too long, it shouldn't go this dark but it turned out fine so don't you stress.


STEP 5: Now add a bit of vanilla essence and stir it in.


STEP 6: Pour into a tray (don't forget to grease the pan) and pat down. Leave to set for an hour or so then cut into squares and you're done !


ENJOY